Monday 17 June 2013

Final Thoughts


Our original research questions in relation to this project were along these lines:
  1. Who was using the games for which there is archaeological evidence?
  2. Is the material used for the game pieces linked to status? (i.e. Are more valuable materials associated with higher ranking individuals?)
  3. Can we infer social standing of individuals based upon the material used for game pieces, where such pieces exist in the archaeological record as grave good?


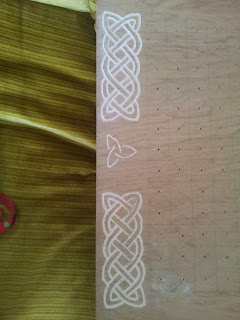
One of the few intact extant medieval tafl boards


As it is, the actual project of making a tafl board and game pieces did not go a very long way in answering these questions. However, we do feel that our original hypothesis that the game pieces were considered to be of much greater value than the gameboards themselves is borne out, based on the amount of work involved and the value of the materials for making the pieces vs. the board. As well, it seems likely the reason so few gameboards exist in the archaeological record relative to game pieces is the result of a combination of factors: the greater durability of the materials used for pieces (ivory, stone, glass, etc) vs. gameboards (usually wood, but also whatever was at hand, such as pieces of slate), but also, importantly, that the pieces were considered of much greater value (because of materials and labour involved in making them), as evinced by their presence in burial finds.


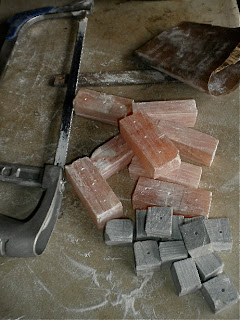
Medieval glass tafl game pieces


Friday 14 June 2013

Let us play!


After doing our presentation, we finally decided to test out our skill with the game of tafl. I (Bona) was playing the defence side (the dark pieces with the king), while Nick was the attacker. The basic rule is for the defence side to move his/her king to the 4 corners to win. The only way to win for the attacker is to capture the king with 3 of the king's sides blocked. To capture the other pieces for both sides is to sandwich the opponent's piece. (I won this round).


While researching about the tafl boards, we found this picture constantly popping up with many of the articles and blogs about medieval board games. This particular one is found in Sweden and the illustration has two men playing a board of tafl with a drinking horn in one hand. (We joked around with the idea of teaming up with the drinking horn and mead group and do a medieval reenactment).


Nick and Shawn played a game afterwards as well. Tafl is a strategy game, but we also noticed that 99% of the times, the defence side with the king also won.


We even had a little competition in Biblio with a friend of mine who joined us for a game of tafl.


That round, Nick won being an attacker side! Way to go Nick! We named him the King of Tafl.


I think out of the 5 games we played, it was the first time that an attacker side won. I was completely addicted by this new (but old) game and even joked about making a tafl club at Uvic.


Here's a link if you'd like to try it out youself online:


There are varieties of the game formats and where to place your pieces in the beginning of the game. Here's a link if you like more information on the tafl game and the instructions on how to play.
http://www.gamecabinet.com/history/Hnef.html


Wednesday 12 June 2013

Gluing, cutting, wrapping it up...

After we finished carving and cleaning all the game pieces, all that was left was to insert the pins used to keep the pieces on the board. We ended up using regular finishing nails since brass nails didn't offer many size options. I glued the nails in and realized that the round pieces would need to be braced so the nails would solidify in a moderately upright position...
 This took quite a while and the glue seemed to have a reaction with the stone and pushed out, making a bit of a mess. After pushing all the nails back in, I left the pieces to set overnight. The next day, we met up and set to cutting the nails down to size. Again, the dremel tool came in handy and a cutting disc made quick work of the nails. We then had to use a blade to cut away access glue from the base of the pieces so that they would sit on the board in a level fashion.
 Once the pieces were all ready, we wiped them down with grapeseed oil to shine them up and make them all pretty like.
 And then...it was done. We soon discovered that the pieces were incredibly soft and were easily scratched in transport, solidifying our thoughts that soapstone probably wasn't historically used because it would be damaged quite easily.
Ooooohhhh, pretty!

Tuesday 11 June 2013

Piece!


We met up yesterday again to finish off the game pieces. We still had 12 more orange pieces to shape them. Shawn realized that we could have used our dremel tool to finish off the pieces much quicker, instead of filing them down.
 
Shawn also thought of to cut off some of the pieces so that we didn't had to file the pieces much. It was much quicker this way! (Why didn't we think of this earlier?)

Due to the electric power of the dremel tool, some of the pieces cracked during the shaping.

This is my hand after filing off and working with the stones.

Nick brought out a dish of water and polishing paper.


For the defence pieces, we decided to carve out a cross on top to make it like a mini-castle, instead of leaving it rectangular.
Here's what it looks like semi-finished.

Using the dremel tool again, we carved out the outlines and the middle of the board.


Nick sanded off the pencil lines that had the grid.

Shawn, Nick and I were joking about how the game pieces reminded us of "hand-made" candies (jujubes).

We did more of the filing down so that the pieces were approximately the same sizes.

Nick used cooking oil to finish the board.

Tada! The finished product of the board!

I first thought that we should do a king piece to look like a person. Shawn and Nick thought that we should copy the ones that were found. But at the end, we all agreed that a tall tower looking structure best fitted our game board.
 
To be continued...

Sunday 9 June 2013

We are the Stone Cutters.


We met up yesterday to start off our game pieces. Nick cut the alabaster stones with a hacksaw before we got to his place. (Due to the short amount of time we had, it was ideal for us to use our tools instead of making medieval ones.) While Nick was doing that, Shawn was carving out the designs for the tafl board with, once again not so medieval, a dremel tool.


Here's the design that we all thought was simple enough for us not to go wrong. I think this stage took us around an hour to pick which knots we liked to use and where to place them. It took us way longer to do that then actually carving them into the board, which took only about 20 minutes.


Nick and Shawn are working away with the files to shape the game pieces. You will probably notice that we were not wearing the best kinds of clothes for this (we all wore dark colours). Shawn was working with green game pieces, while the pink ones that Nick and I (Bona) were working on took a little more time due to the shape of the pieces and twice as many to work with.  


 There are some untouched and finished pieces. From the archaeological finds, we often find game pieces rather than gameboards. The factors of that could have been because of the amount of time and effort it takes to make one game piece. Nick and I both took about 20 to 30 minutes to file down the pieces so it was the right size and also, to round the top off. Because we only had two files to work with, I (Bona) ended up using the sand papers to shape. We later found out that sand papers take way longer to make a game piece compared to the files.


Saturday 8 June 2013

Stop...drill time!

So here are a few snaps of the blocks measured, sectioned and drilled up! The board was also drilled but the pictures I took vanished from my camera for some reason so later board pictures will be of a more completed version. We used a 3/32" bit and a cordless drill to drill everything because A) I have no idea how these things would have been produced originally and B) I can't seem to find any of my Medieval Tafl piece building tools...weird.

Undrilled but all marked up a ready! 
Drilled...see the drilled board in the background? Good, that's the best picture of it...

Drilled pink alabaster...and the not-so-Medieval technology that drilled it.

Wednesday 5 June 2013

Stone blocks

We decided to use the salmon/pink alabaster for the attacker's pieces, and greenish soapstone for the defender/king's side. We decided against the black BC soapstone because, though it polishes up very nicely, it is surprisingly hard for a soapstone, and contains some quartz veins, which are extremely hard to cut through, let alone carve.
So, here are the cut blocks of stone (cut using a hacksaw: very efficient. Not having the same quality of metals in the Middle Ages, it would presumably be a lot harder and time consuming to cut stone). There should be enough there for all the game pieces, which will end up being approx. 3/4" diameter. We will drill the holes for the pins before cutting up the individual pieces and carving them to the right size and shape.


The brass nails are proving to be a little more challenging. After visiting three hardware stores, the only brass nails I found are very small - maybe too small? We will have to see how fiddly it is to drill holes that small...

Tuesday 4 June 2013

Tafl Update!

Yesterday we got together with the soon-to-be tafl board and started making some plans. We decided to go with a 13x13 gaming surface as that size seemed to be commonly referenced. To keep things simple we opted to make 1 inch squares which would allow us a 2.5 inch boarder around the entire board so we could do some snazzy decorations. After some straight-edging and quit calculations, we managed to sketch the design on to the top of the board and made a pattern to simply the drilling of the holes for the game pieces. Nick has offered to get the nails we will be using as pegs for the game pieces and once we know the size of the nails, the board is all ready to be drilled!